
Copyright © All rights reserved. Made by Mad Dwarf Productions. Terms of use | Privacy policy

A Walk-Through of Various Techniques
Step-By-Step Guide
Stage 2 - Making the Barricades
Brushes: For large areas of PVA, a 1” round brush works best . A second large brush for painting the base will be needed, along with a smaller one for details. Smaller again, the barricades will need to be painted with a detail brush.
Glue: Large tub of PVA, and a container for watering down. (Yogurt tubs work well)
Flock: A bag of artificial grass, and maybe some sand for paths.
Paint: Tester-pots from DIY stores can be good for bases. Lots of green, and some brown. Grey can be useful.
A Base: An old CD works for this. Advanced modellers may use a small wooden disc with bevelled edges.
Polystyrene: Often used in packing, this is an invaluable material for modelling!
Cocktail Sticks: Matches, lolly sticks and coffee stirrers also work.
Craft Knives: These sharp blades come in two styles - replaceable-blade scalpels and extendable-blade “snap-offs”.
Spray Paint/Rough Coat: We will not be using these in this tutorial.
Bitz Box: Always needed!
Water: A small jar to wash brushes in. PVA brushes should be rinsed thoroughly under a running tap
Things you will need:
While your base dries, you can be making the barricades. While this can be a fiddly
process, it does not take any advanced modelling skills. 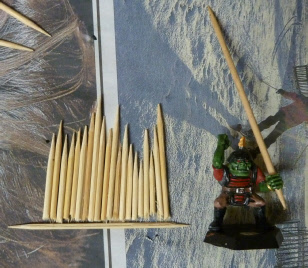
Take a few cocktail sticks and snap them to length. Judge this by comparing them against one of your model soldiers. The sticks should be a few millimetres longer then needed, to extend into the base. (A lot of modellers keep a specific model on their workspace just for this. He is often called “Barry”.) If the snapped sections need tidying up, you can cut them with modelling snips, or cut off bits with a craft knife. The best way to do this is to place them on a flat surface (preferably a cutting board) and cut down onto them, trimming off any unwanted parts.
Working on a sheet of newspaper, or other protective surface, arrange the sticks
as desired, keeping the bottoms of them level (Use a ruler, or another cocktail stick,
to do this).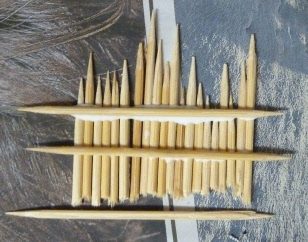 Take another cocktail stick and coat one side with PVA. Lay this stick
across the others, forming a brace. You may find you need two sticks to hold them
firmly. Alternatively you can use a lolly stick or coffee stirrer as a brace, its
extra width will hold the cocktail sticks better. You will want to be very generous
with the PVA here, to ensure it holds all of the sticks. Do not worry about getting
too much glue on the sticks! More rather than less will hold them better. While the
glue is still wet you can nudge the sticks back into the correct positions, as they
will invariably move as you put the braces on them.
Wash your brushes and leave the barricades to dry.
