
Copyright © All rights reserved. Made by Mad Dwarf Productions. Terms of use | Privacy policy


Matchbox Buildings
To make a change from square buildings, matchboxes can be used to make hexagonal
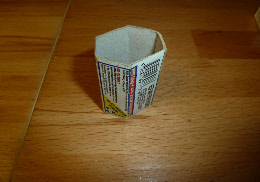 ones, or form terrain in the style of The Giant’s Causeway.
To begin, take a matchbox and remove the matches and inner tray. Put these aside (we’ll find a use for them later). Squash the box flat, folding the long sides. Ensure the folds are straight and sharp. This forms the basic hexagon. Next, use the hexagon to trace a ‘lid’ on the cardboard (You can use the inner trays for this). It is not easy to get this exactly right, and some estimation will be needed. It is not essential to be completely precise, as gaps can be covered later, but get as close as you can. Cut out the ‘lid’, making sure to include some ‘tags’ to glue it to your hexagon. You may find you have to alter your first attempts, but so long as you have enough card, you will soon get the hang of it. This forms the roof of the building, and, once dried, is a nice, modular section.
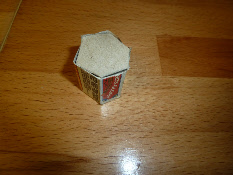 This is now repeated, but to make the different sized hexagons, the matchboxes can
be cut down before starting. Try to make the cuts as straight as you can, or the
buildings will lean, and not fit together well.
Once you have a number of these, you can place them together to form a large complex. Glue the sides of the hexagons together, being careful of the rough ‘striker’ sides of the matchboxes, and keeping the bases level.
I would recommend gluing the complex onto a base, as otherwise it can be a little
fragile, and you will find yourself rebuilding it frequently. The slim walls are
tricky to glue down, but enough PVA should hold them.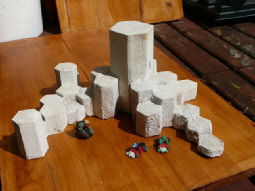
The ‘lids’ will probably have gaps around the edges, and these can be filled with Plaster of Paris or other filler. If you are planning in coating the whole model, this will naturally fill the gaps. If you are just going to rough-coat them, the gaps need filling separately. I would usually suggest covering the whole model, as the hexagons tend not to fit perfectly, and the gaps between them need filling. The coating will also add texture to the model.
Once the coating is dry, the model can be painted, and doors, windows etc painted on, or if you are feeling adventurous, made from card/plastic and glued into place.


- Matchboxes
- A base .
- Paints, brushes and flock.
- PVA glue.
- Craft Knife.
- Scissors.
- Thin Cardboard.
- A model soldier, for scale
- A place to work, including somewhere to leave while paint/glue dries.
- Plaster of Paris, or other coating material.
You Will Need:
Additional techniques include using larger “cooks matches” boxes and adding more
detail such as radar dishes, gun mounts and other nik-naks.
You could also give them
a rock-effect, and use the model as a Giant’s Causeway type terrain feature.
Extra Credit
