
Copyright © All rights reserved. Made by Mad Dwarf Productions. Terms of use | Privacy policy
A Walk-Through of Various Techniques
Step-By-Step Guide
Stage 4 - Washing. Attaching the Barricades.
Brushes: For large areas of PVA, a 1” round brush works best . A second large brush for painting the base will be needed, along with a smaller one for details. Smaller again, the barricades will need to be painted with a detail brush.
Glue: Large tub of PVA, and a container for watering down. (Yogurt tubs work well)
Flock: A bag of artificial grass, and maybe some sand for paths.
Paint: Tester-pots from DIY stores can be good for bases. Lots of green, and some brown. Black and white can be useful.
A Base: An old CD works for this. Advanced modellers may use a small wooden disc with bevelled edges.
Polystyrene: Often used in packing, this is an invaluable material for modelling!
Cocktail Sticks: Matches, lolly sticks and coffee stirrers also work.
Craft Knives: These sharp blades come in two styles - replaceable-blade scalpels and extendable-blade “snap-offs”.
Spray Paint/Rough Coat: We will not be using these in this tutorial.
Bitz Box: Always needed!
Water: A small jar to wash brushes in. PVA brushes should be rinsed thoroughly under a running tap
Things you will need:
We shall now focus on the rocks in front of the barricades. The flat brown paint needs some attention. Here we introduce Washing. Not cleaning the model, this simple technique is done by using a watered down, darker version of the base coat, and ‘washing’ it into the recesses, emphasising the shadowed sections. For scenery, you can use a reasonably large brush, with a generous amount of Wash on it. Paint it into the recessed areas, making sure to get into all of them. Do not worry about it covering raised areas, the wash will run off them, and they can be highlighted afterwards. If too much wash has pooled in an areas, it can be picked out with the brush, and deposited elsewhere. While you can experiment with several darkened tones, I find that a black wash will work reasonably on most base colours. Always make sure that the Wash is quite thin, or it will cover the base coat too much. You can always add a second Wash, if needed.
Caution: Being thinned, and pooling in recess, the Wash may take longer than expected
to dry. 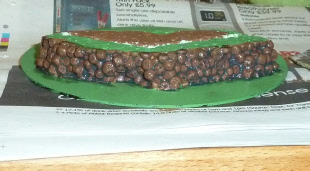
As a wash can darken an area notably, it can be a good idea to add a dry-brush highlight afterwards to pick out the raised sections. Alternatively, a light dry-brush may be added first, and the wash used to tone it down a little.
This leaves us with the basic “3-stage highlights”: base coat, wash and dry-brush. More advanced modellers may use several of each, varying the tone gradually to produce more dramatic results.
Once the wash is dry, we can fix the barricades into place. This can take some adjusting, so keep a craft knife handy. Carefully slip the barricades into their slots, checking how well they fit, and what angle they sit at. Carefully cut out any excess polystyrene to make an even fit. When you are happy with how they will be, dip the bottom of the barricade into PVA, being careful not to over do it. Slide the glue-covered section into the slot, and leave to dry. You may find it tries to lean, in which case it will need supporting while it dries. Also, small pieces of polystyrene, cocktail stick, or other material may be used to fill the gaps to help hold the barricade upright. These will be covered with flock later.
