

Copyright © All rights reserved. Made by Mad Dwarf Productions. Terms of use | Privacy policy

Protect your Armies using household items!
Cocktail Stick Barricades
To begin, you need to roughly design your barricade. Starting with the base, decide where you would like the palisades to go, and collect enough (preferably more) cocktail sticks.
Using your soldier for scale, snap a selection of sticks to length. Don’t forget to make them a few millimetres longer than needed, so there is some to sink into the polystyrene. For a ramshackle effect, make them slightly different lengths.
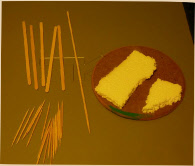
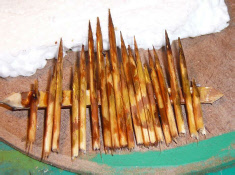
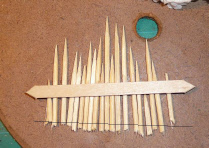 Place these sticks on a flat surface and arrange as you would like your fence. Take
another cocktail stick (I have used a lolly stick) and place it across them to form
a brace. This needs gluing in to place. You will probably dislodge some sticks doing
this, so make sure to rearrange them as you go. The picture shows a line where the
bottom of the sticks should be approximately level. This does not need to be perfect,
as it will be hidden by the base. Once you are happy with the fence, leave to dry
for an hour or two.
Place these sticks on a flat surface and arrange as you would like your fence. Take
another cocktail stick (I have used a lolly stick) and place it across them to form
a brace. This needs gluing in to place. You will probably dislodge some sticks doing
this, so make sure to rearrange them as you go. The picture shows a line where the
bottom of the sticks should be approximately level. This does not need to be perfect,
as it will be hidden by the base. Once you are happy with the fence, leave to dry
for an hour or two.
You may wish to make more than one section of palisade, and practice getting the heights correct. Don’t worry about getting glue all over the sticks, this can be sorted out later.

- Cocktail sticks. Lolly sticks work, too.
- A chunk of expanded polystyrene.
- A base (I used a piece of plywood, but an old CD works just as well.)
- Paints, brushes and flock.
- PVA glue.
- Craft Knife.
- A model soldier, for scale
- A place to work, including somewhere to leave while paint/glue dries.
You Will Need:
While the sticks are drying, take some polystyrene and snap to size and shape. The rough edges can make good rock/cliff effects. Other sections can be carved to shallow slopes for your models to be placed on. Once you have this done, carve a slim ‘trench’ for the palisade to fit into. This needs to be about 1mm wide, and 3mm deep. It is a little tricky to do, but don’t worry about making it being a bit rough and ready. When the fence is in place, it can be filled in and covered over.
Shaping the polystyrene
 Back to the sticks! Now they are dry (and assuming you have re-glued any that didn’t
stick well, or fell off), they can be painted. A mix of browns and yellows can give
a good effect, especially with a heavy sepia wash. I tend to then put a black wash
over, concentrating on the fire-hardened tips! Paint may not stick well where PVA
has leaked over them, so this can be scraped off, if needed.
Back to the sticks! Now they are dry (and assuming you have re-glued any that didn’t
stick well, or fell off), they can be painted. A mix of browns and yellows can give
a good effect, especially with a heavy sepia wash. I tend to then put a black wash
over, concentrating on the fire-hardened tips! Paint may not stick well where PVA
has leaked over them, so this can be scraped off, if needed.
Leaving the paint to dry, it is time to put the polystyrene into place. Glue it into
position on your base, and then paint the ‘rocks’. I use a light grey, washed with
black to bring out the contours. This can then be dry-brushed to pick out highlights.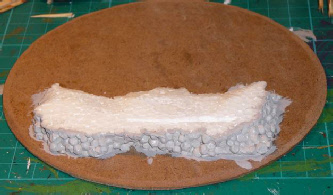
Back to the polystyrene


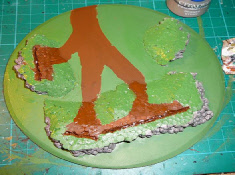 We can now paint the rest of the base. Although it will ideally be covered in flock,
painting it a matching colour can help when it inevitably wears away. Use this time
to mark out paths and other sections. Check that the fencing still fits, and adjust
as needed. Once you have this stage done, it is possible to just put the palisades
in, and use. But it looks a lot better with flock, and a few nik-naks, to liven it
up. Glue in your fences, and then flock the base.
We can now paint the rest of the base. Although it will ideally be covered in flock,
painting it a matching colour can help when it inevitably wears away. Use this time
to mark out paths and other sections. Check that the fencing still fits, and adjust
as needed. Once you have this stage done, it is possible to just put the palisades
in, and use. But it looks a lot better with flock, and a few nik-naks, to liven it
up. Glue in your fences, and then flock the base.
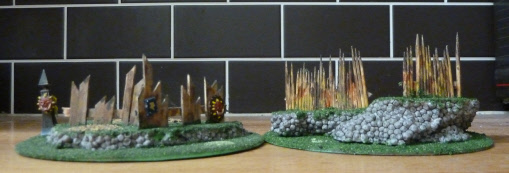
You now have a bare-bones barricade!
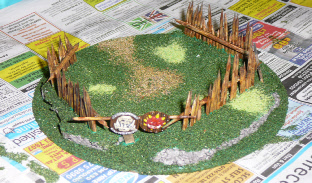 To make it an outstanding piece, and not a thrown-together jumble, I recommend adding
a few bits and bobs. Discarded weapons, helmets, ammo boxes, barrels - whatever you
have lying around in your bitz-box. Just be careful not to litter the whole thing,
or you’ll leave no room for models! Maybe some barbed wire across the front of the
fence, or strung between sections. Here, I have added some sand along the path, and
Ork Glyphs to scare off unwanted intruders!
To make it an outstanding piece, and not a thrown-together jumble, I recommend adding
a few bits and bobs. Discarded weapons, helmets, ammo boxes, barrels - whatever you
have lying around in your bitz-box. Just be careful not to litter the whole thing,
or you’ll leave no room for models! Maybe some barbed wire across the front of the
fence, or strung between sections. Here, I have added some sand along the path, and
Ork Glyphs to scare off unwanted intruders!