
Copyright © All rights reserved. Made by Mad Dwarf Productions. Terms of use | Privacy policy

A Walk-Through of Various Techniques
Step-By-Step Guide
Stage 5 - Flocking. Finalising
Brushes: For large areas of PVA, a 1” round brush works best . A second large brush for painting the base will be needed, along with a smaller one for details. Smaller again, the barricades will need to be painted with a detail brush.
Glue: Large tub of PVA, and a container for watering down. (Yogurt tubs work well)
Flock: A bag of artificial grass, and maybe some sand for paths.
Paint: Tester-pots from DIY stores can be good for bases. Lots of green, and some brown. Grey can be useful.
A Base: An old CD works for this. Advanced modellers may use a small wooden disc with bevelled edges.
Polystyrene: Often used in packing, this is an invaluable material for modelling!
Cocktail Sticks: Matches, lolly sticks and coffee stirrers also work.
Craft Knives: These sharp blades come in two styles - replaceable-blade scalpels and extendable-blade “snap-offs”.
Spray Paint/Rough Coat: We will not be using these in this tutorial.
Bitz Box: Always needed!
Water: A small jar to wash brushes in. PVA brushes should be rinsed thoroughly under a running tap
Things you will need:
To finish the basic model, it needs to be Flocked.
Cover your work area with a large, clean sheet of newspaper, not only to protect
the area, but also to catch the large amount of excess flock, that can be reused.
Coat the areas to be flocked with generous amounts of PVA glue. Now completely cover
the glued areas with flock. Use far too much. There is no harm in coating it to a
centimetre deep, and this will help to ensure that it has covered all of the area.This
now needs to be left to dry.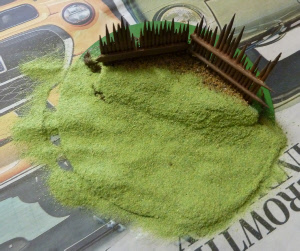
If you are using different areas of flock, say green “grass” and a sand path, they should be done separately, as otherwise you will mix the excess materials.
Once the glue is thoroughly dry, carefully pick up the model, and turn upside down over the newspaper, ensuring to collect all of the excess flock, rather than letting it spill onto the floor! This is not only a waste of good flock, but can be difficult to clean up. Tap the underneath of the model lightly, to remove all excess material. The paper should then be used to transfer the excess back into the storage container. Check your model for bare patches, where the flock has not stuck adequately, and fill these areas if needed. You can use a thinned down glue for this, dripping into the area, to avoid brushing flock everywhere.
If other sections are required, repeat this process, allowing to completely dry between each.
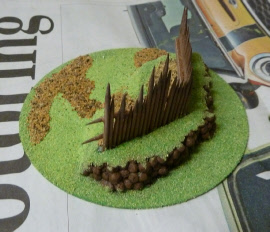
Your model is now ready to use, but for extra credit, you may wish to add details such as crates, barrels, discarded guns and equipment, etc, or to add graffiti or battle-damage to the barricades. Razor wire can be strung across the fences, or between sections of them, and tank-traps placed in front.
